Tuesday, January 16, 2024

More Community Quilts - this one from Bonnie Hunter

 An oldie but a goodie - first published in 1999 as a Community Quilt pattern. Find it on Bonnie Hunter's blog/freebie tutorial site:  Quiltville's Quips & Snips!!: Free Patterns!

Quiltville's Quips & Snips!!: Free Patterns!

SCRAPPY TRIPS in Bonnie's tutorial are 6 strips turning out a 12" finished square.

I’ve made this pattern in 6 step trips and it turned out well – the picture is on the guild’s Facebook page!

However, I had a hard time keeping the sequence of the strips in order so that I ended up unsewing and resewing far more than the pattern called for.  Therefore I am offering the following advice.  This won't make much sense if you have not read through Bonnie's free pattern linked above but if you are thinking of making this quilt with your leftover 2 1/2" strips it might prove helpful.

Today I am trying it in a 5 step version.  I have learned a few things about making this quilt that might be worth sharing.  I have found that keeping the strips in order so that removing the correct seams in the right sequence is more challenging than I thought it would be.

I have found a method this time around that is working really well, so I’m going to share it here (and with a link FaceBook as well as our website) to help others avoid the confusion and resewing that I did on my first effort.

1st -   Alternating lights and darks works best – it doesn’t matter what color comes out on the full diagonal. Variety is good!

2nd – I use a slotted ruler to cut the strip sets – saves so much time! I place colored stickers on the correct slots – so easy!

3rd – once the sets are on the cutting mat, don’t disturb the sequence!
Place a pin within the seam allowance at the top of the first strip.
take the next strip and move the top seam allowance down one fabric and place a pin in that seam allowance. Continue along the strips inserting pins in all of the seam allowances that will be removed.

4th – stack the strips IN ORDER and clip them all together in the middle of the stack so that the intended seam allowances are all in a line.

Now it is safe to remove the stitches in the designated seams.
Just unfold them - lay the strips on your design board and sew your block!


Strip sets bundled by block with stitching in top blocks removed - total of three blocks.

I use a plastic scrap box to keep my blocks flat until I have enough for a quilt top.


The strips are cut at 2 1/2" so the blocks finish at 10" square.

The version with 6 strips finishes at 12" square, but that size is too big for this box!

That's all for today.

Thea 


Wednesday, November 8, 2023

Easy Scrap Quilts for Community Quilts

Most bindings are cut at 2 1/4" but I like the totally machine applied method, so I cut my bindings at 2 1/2". This way the leftover bits can easily be cut to 2 1/2" squares to use for 4 patch blocks. Lately, however, I've been cutting my leftover bindings to "chips" of 2 1/2" x 4 1/2" to use in "Potato Chip" blocks. These blocks are so much fun - no points to match - no worries about colors, etc. 

Start with two pieces sewn along the long edges, then add a single piece along the sides of the first pair. Additional chips are added by sewing along the short edges. Before you know it, the block is done! They are also fun to make in batches of 2 - 4 at a time, chain piecing at random.

Of course, others will want more control, such as neutral centers with dark outer borders, or dark centers with lighter outer borders. Both of these can be used alternately for variety with dimension. You can stop at 8" blocks:


Or additional chips can be added to your desired size - another round makes a 12" block:

Or maybe you just want to empty your autumn stash?


Any color combination is up to you! Have some fun with your chips!

Thursday, September 14, 2023

QCE Community Quilts Progressing in Leaps and Bounds


QCE Community Quilts – September Newsletter article

COMMUNITY QUILTERS - Please see the FACEBOOK posts for current pattern ideas. 

This month we will be concentrating on things to do with leftover 2 ½” strips. Mostly 4-patch blocks and several ways to use them! Bring some 2 1/2 " strips along on Sept. 26th to play with.  Full width strips, leftovers from jelly-rolls, remains of bindings, and any other strips you have laying around. The ideas will work with a variety of strip lengths, widths, and accuracy (or lack thereof) so bring your strips and let’s make up enough kits to hand out for the guild members to take for the next few months.  You might not need to sew, but there will be lots of planning, pressing, cutting and sorting.

Many of the quilt kits include scrappy blocks – this is how they grow – feel free to grow your own!
These were made using the “straightening cuts” to square up fabric for the ‘real’ cutting.

  1. Starting with the smallest bits of scraps - join together any two pieces, then add two more pieces all around. 
  2. Next add strips as desired - until the block is about 4" across it can be wonky, but once it gets a little bigger you can square up the sides before adding the last four pieces around the outside - I save the wider strips (up to 2") for the last round to allow for easier intersections when joining rows.
  3. Sewing in sets of 3 or 4 without cutting between blocks conserves thread.
  4. Blocks should be "squared up" to 6 1/2" (6" finished size) for the quilt.
  5. Blocks can be combined with alternate solid pieces when joining rows.
  6. With 18 of each you can make a quilt center of 36" x 36" plus a border of your choice for up to a 42" square quilt.


The September 26th Community Quilts Evening Sew-a-long at First Presbyterian Church in Greensburg might be the last ‘in person’ event for the Fall season.  I’m thinking it might work better as a ZOOM sewing event as the days will be shorter and the weather will likely be worse as we go into the winter months. This also has the added benefit of being in our own sewing spaces without needing to pack up and haul everything to the meetings – although it will be fun to do it again in the spring once the weather is more cooperative. The ZOOM links can be up all day and into the evening so members can drop in as they are available.

We are collecting quilts for delivering to Project Linus, hospitals and nursing homes. There are 17 quilts collected so far. Please bring your completed quilts or fabric/batting donations – batting scraps that can be cut to 10” squares (or larger) are especially appreciated. Quilt sizes: 36”x36”, 40”x 40”, 40”x 50” and up to Twin size.
Also, if you have a coupon or happen to be in Joann’s and get the sudden urge to donate batting, a twin is a better bargain than a crib.

There may be a need for “Fidget Quilts” for Memory Care Units, so start collecting ‘Fidget Fodder’ for a future project. Similar size to the placemat project we did last season. Links and posts will be added to the QCE Facebook page as well as the blog. Watch for more information in future Friday updates!

Any suggestions or questions? Call or text Thea at 724-516-1439 or email grannygoodstuff@ymail.com


Tuesday, May 2, 2023

It's May, it's May! the Lusty Month of May!

 Do you remember that song from CAMELOT?    

It's an earworm for me! Every year... the first week of May.

I can hear it in my head.... Julie Andrews singing loud and clear as she dances her way thru the streets of Camelot:

GUENEVERE:

Tra la! It's May!

The lusty month of May!

That lovely month when ev'ryone goes

Blissfully astray.

Tra la! It's here!

That shocking time of year

When tons of wicked little thoughts

Merrily appear!


It's May! It's May!

That gorgeous holiday

When ev'ry maiden prays that her lad

Will be a cad!

It's mad! It's gay!

A libelous display!

Those dreary vows that ev'ryone takes,

Ev'ryone breaks.

Ev'ryone makes divine mistakes

The lusty month of May!

Whence this fragrance wafting through the air?

What sweet feelings does its scent transmute?

Whence this perfume floating ev'rywhere?

Don't you know it's that dear forbidden fruit!

Tra la la la la! That dear forbidden fruit!

Tra la la la la!

GUENEVERE:

Tra la! It's May!

The lusty month of May!

That darling month when ev'ryone throws

Self-control away.

It's time to do

A wretched thing or two,

And try to make each precious day

One you'll always rue!

It's May! It's May!

The month of "yes you may,"

The time for ev'ry frivolous whim,

Proper or "im."

It's wild! It's gay!

A blot in every way

The birds and bees with all of their vast

Amorous past

Gaze at the human race aghast,

The lusty month of May.

CHORUS:

Tra la! It's May!

The lusty month of May!

That lovely month when ev'ryone goes

Blissfully astray.

Tra la! It's here!

That shocking time of year

When tons of wicked little thoughts

Merrily appear.

It's May! It's May!

The month of great dismay.

GUENEVERE:

When all the world is brimming with fun,

Wholesome or "un."

GUENEVERE & CHORUS:

It's mad! It's gay!

A libelous display!

Those dreary vows that ev'ryone takes,

Ev'ryone breaks.

Ev'ryone makes divine mistakes

The lusty month of May!

wow - did you read the whole thing? Good for you! It's a fun song. I't's the Month of Yes You May!  
I have done something "Blissful" - I'm getting a new 'Moxie' quilting machine - I worked poor Helga too hard and I've decided to let her retire.  Now, before I can start quilting again, I will need to spend a week of penance cleaning and sorting the quilting area - so she (Moxie) will be impressed and cooperative in her new home. 

Meanwhile, I'm packing up as many quilt tops/batting and backs as I can in preparation of the new-to-me machine due to arrive next week. I'm absolutely giddy with anticipation!
In case you need something to do with your scraps, here's an idea - cut 31/2" strips of news print and sew your wonky scraps to it into a nice long roll of .... something that can be used for either blocks or borders! 

These 6" (finished) blocks make a fun use of the trimmings that we have when squaring up fabric yardage for rotary cutting.

Let me know if you want to get together with me and make a pile of these blocks - I may have an air-conditioned room we can use this summer if you're interested!


Monday, April 3, 2023

Community Quilts - Rail Fence quilt for Summer Sewing - Fat Quarter Friendly

 Rail Fence 

One of my very first Rail Fence quilts was gifted to a new baby who eventually went to New Zealand with his parents. Therefore, I am known internationally for my quilting!  Yes, that might be stretching the truth just a bit... but my work is also in England and several European countries as well!

I want to share this with you to encourage you to join in with QCE Community Quilts and learn more about quilting as well as a few scrappy tricks along the way!

This quilt is in Alex Anderson's book START QUILTING, now in its 3rd Edition! Here's a link to check it out!

Start Quilting, Third Edition with Alex Anderson (alexandersonquilts.com)

This Rail Fence pattern is the first one in her book. Super easy and quick to make!  We all have fat quarters, they are irresistible and so very useful!

While her pattern calls for yardage, I found that it also works well with only SIX fat quarters!

Here is my EQ8 jpeg of her quilt done in a two block version:


I only have the 6" blocks sewn into rows so far, and it looks like this:

Now to add the borders! I think I might need some more of that butterfly fabric.
Might I also have to shop my stash for some more aqua?

Will you see it at our next Guild meeting?  I sure hope so!

Thea McCurry
Community Quilts
Quilt Company East


Sunday, April 2, 2023

QCE COMMUNITY QUILTS donations to Three Rivers Youth

 These quilts were all donated to the Three Rivers Youth as graduation gifts.

Please leave comments below - especially if you are one of the many talented QCE quilters who give so generously of their time and talents.


Tuesday, January 17, 2023

SEW DAY Feb 18 2023

 Quilt Company East members will be making placemats to donate during this year's sew day. 

If you have a favorite pattern - by all means use it! 

If you have no idea where to start you are welcome to try one of the following found on YouTube:

Quilt-As-You-Go Place Mat Tutorial - YouTube

How to Make the Quilt-As-You-Go Placemats from June Tailor | A Shabby Fabrics Sewing Tutorial - YouTube

Quilting Tutorial: Quilt-As-You-Go Placemats - YouTube

Placemats from Fat Quarters - YouTube

Self Binding Placemat - SUPER SIMPLE!! - YouTube

Quilt As You Go Venice Placemats | A Shabby Fabrics Tutorial - YouTube

Quilt-As-You-Go Placemats perfect for holiday gifts! Quiltmas in July - YouTube

Quilt As You Go Placemats From a Jelly Roll! - YouTube

Quilt-As-You-Go Place Mat - YouTube

Easy Quilted Placemat Tutorial | Quick and Easy Placemats - YouTube

QUILT AS YOU GO Placemats for a Midnight Quilt Show DINNER PARTY with Angela Walters - YouTube

If you want to watch all of these, go for it!  I tried watching them all but my eyes started to cross... forgive my low attention span!

I believe the 'Official Program Committee' will be sending out guidelines and a pattern as well as a preferred size - all of the above designs can be adjusted to whatever size is needed.

Many of these can also use up some of those leftover 2 1/2" strips we all have in our scrap bins.

Hope you can join us!

The ZOOM link for the Sew Day will go out via email to guild members prior to the Event. 


Monday, April 18, 2022

Bag making sew day on May 19

Most of us have patterns we've been longing to make, but if you are one of the few who needs a bag pattern for sew day in May, here are some suggestions.

Sources for free bag patterns 

 “moda bake shop free bag patterns” (search revealed dozens of free patterns!) 

 35 FREE Coin Purse Patterns (sewingsupport.com) 

 Free Sewing Patterns – Bagstock Designs 

 https://sewcanshe.com/free-bag-patterns/ 

 https://www.allpeoplequilt.com/bags-pillows-gifts/bags-and-purses/free-bag-patterns

If you have other sources not mentioned above, please share them in the comments!

Here is the bag I taught years ago at a NewBees class:


UFO Tote Bag            


Supply list:

UFO blocks – recommend 12” or larger, cut into strips – or other scraps or several fat quarters or some 2 ½” strips from a jelly roll… whatever you have – any scraps are fair game!

½ yard of lining fabric (or 2 fat quarters)

½ yard of fusible fleece (I like the thinnest fusible fleece for bags but the foam is getting very popular too – I really prefer the fusible fleece for this as it is much easier to handle through the sewing machine.)

¾ yard for handles and outer bag – note (1 ¼ yd) belt webbing can be substituted for handles – reduce yardage to ½ yd of fabric.

3” full width strip for bag facing – I used a contrasting fabric that was not used much in my bag – but you can use whatever you like… - fold/press in half lengthwise (binding wise) and set aside*** Note:  wider is better, but narrower won’t work.  A 3” strip will only give you a 1” facing.

Thread that matches the lining fabric

Sewing machine – walking foot helpful but not required.

This project will use up some of those blocks you may have started and decided you just did not like well enough to finish… or maybe just a bunch of scraps that have no other purpose.

If you have no orphan blocks, any strips will do…. A few fat quarters will be enough to substitute for the blocks.  I used six 12” blocks from a 9 block quilt that I was never going to finish.  I cut them up into strips of varying widths from 1 ½” to 2 ½” – or maybe 3” not parallel but narrow at one end and wider at the other.  It doesn’t matter how wide you cut them as long as the cuts are straight.  The wider you cut, the fewer you need… hint, hint.

I had another piece of fabric in the stash that was about ¾ yard – I cut two 4” strips across the full width for straps and set them aside.  From the rest, I cut for the outside top and bottom of the bag – 3 inches wide x WOF for the top, and 6” x WOF for the bottom. 

And …. I cut ½ yard for the lining from another fabric.

First, I steamed the lining fabric to a piece of fusible polyester batting.  I cut this into two pieces to make it easier to handle – a front and a back!  Each piece was about 20” x 18” (like fat quarters!)

I marked two parallel lines (with a permanent pen) on the top and bottom of the fleece side to guide where my strips should cover.  You can cover yours in a wider or narrower strip, but I recommend at least 6- 8”.  Mine was 10”, but 8” looks good, too.  If you make a narrower strip, you’ll need more fabric for the top & bottom.  Think of it this way, you have an area 18” high and 20” wide to cover with fabric.  Your pieced section will need to be 20” wide, so you may, if necessary, adapt the height to accommodate the size of blocks or scraps you are using.  My blocks were 12”, but I trimmed them to fit 2 bands of piecing 10” high and 20” wide.

Starting in the middle, I used the ‘quilt as you go’ method to sew the block/strips to the middle of the fleece.  Make sure the strips cover the guidelines on both ends (top and bottom) as you sew them down.  Sew them ‘right sides together’ - You want to go a little past the lines with your stitches, then pull your threads to the ‘inside’ of the seam and tuck the thread tails into the seam allowance on top.  Use ¼” seams for the strip piecing.

Complete a band of strip piecing through the center of both pieces.  Make sure you have covered those lines you drew on the batting! You may want to snip off any strips that go well past the lines – but you want to allow for about ½” seams in the rest of the bag.

Square up both sections once strips are completed.

Measure both fleece/pieced sections and trim so that both have the same measurement from the pieced section to the top edges and the bottom edges before adding the bottom and top fabrics.

These will also be added with the “sew & flip” technique. – you may want to re-mark guidelines onto your pieced sections to make sure you enclose all the ends in this seam.

After adding the top and bottom fabric to both pieces, baste or zigzag (not satin stitch, but a wide open zigzag) along the edges to help prevent them from sliding when you sew the seams – I like to sew all the way around both pieces with a zigzag stitch to cover the raw edges, since that’s all the finishing they will get in this bag.  If you have a serger, that also makes a nice finish to these edges.

Note:  there is no lining or turning required with this bag!

The only difficult part is sewing the side seams so that both sides match exactly…. But if they don’t it isn’t going to make the bag any less useful!

For the straps, you can use a finished belt webbing in a color to match, cover the belt webbing with a matching fabric or make straps from leftover batting with fabric strips wrapped around it and sewn for reinforcement.  A full width strip (4” or so) with a 1” strip of batting in it will make a nice set of straps.

The straps are usually cut about 20” long.  Some like them shorter, some longer – cut your straps short or longer to your taste.  Make sure they are both the same length.

Straps:  Cut 2 strips 4" x 20".
Fold and iron the strips in this way – tucking the webbing or fleece into the first fold– it doesn’t show in these pics…Sew the edges and make sure the handles are the same length. Fancy stitches are optional.

 Mark the center of each top bag piece with a straight pin, then measure 3” to each side and put pins there also.  The inside edges of the straps will be alongside those pins, which are 6” apart.  Go ahead and sew (baste) the straps to both sides of the bag now (with the straps hanging toward the outside bottom of the bag.  Again, use a zigzag stitch along the edge so the strap edge does not ravel, then sew again with a straight stitch so the straps are secure.  Back stitch if you feel inclined…

Pin the straps to the outside body of the bag until after the side seams and bottom are sewn. 

***Top Edge Facing:

Turn your bag right side up in front of you – leave the straps pinned for now – pin the pressed facing strip(s) to the top edge of the bag – raw edges together, fold toward the bottom, on the OUTSIDE of the bag, OVER the raw edges of the straps.  Sew this facing to the top edge of the bag using your walking foot with a ½” seam allowance.  Press the facing up away from the body of the bag.   

Now sew the side seams – top to bottom – fold the facing seams in opposite directions to make the side seam less bulky and easier to turn…then sew across the bottom – use a ½” seam allowance (or more).

Press all seams open – use steam and/or starch.

Turn the facing to the inside of the bag.  The fold is now on the inside, ready to cover that unsightly raw edge at the top.  Pull the now unpinned straps up into ‘carry position’ – pin the facing with the pins on the outside of the bag – be sure to tuck in those facing/side seam allowances or trim them so they don’t show.  With facing side down, topstitch ¾” and ½” from the top edge.  Use a decorative or matching thread.  Again, FANCY stitches are optional!

Press side and bottom seams open.  You may need to ‘unstitch’ the corners to get them to lay flat.

Form box bottom.

With bag still wrong side out, align side and bottom seam of one corner – flatten the point with seams together, steam press the points open, mark a sewing line about 2” in from the corner/point.
 Note – the further you sew from the point, the wider your bag will be – you decide how ‘flat’ you want your bag!  I make mine about 4” wide.  Just make sure that BOTH of your corners are the same distance from the point! Repeat the operation for the other corner.

You are almost done!

Clip all threads, trim any straggles, and your bag is finished! 

Bring your bag to next guild meeting for show & tell

 Note:  This bag can be adapted to a much smaller bag for gift size bags or children’s totes.  Send me pictures!


Wednesday, March 30, 2022

Quilt Show & Tell Pictures

Show & Tell on Monday March 21, 2022

(sorry, no data available)

If any of these are yours and you would like info on your quilt included - please email info to me at grannygoodstuff@ymail.com


Tuesday, February 22, 2022

TUTORIAL from Quilt Company East Quilt Guild Sew Day - 2-19-2022

With so many guild participants and friends from far and near joining in on ZOOM, it seems appropriate to share some of the goings on with those unable to attend. The block of the day was very well received so let's put it here for future reference!

This block tutorial was presented as a Power Point slide show at the QCE Sew Day on Saturday February 19, 2022.

All guild members are encouraged to make a block for Community Quilts. Choose a variety of Black on White and White on Black prints for contrast. Note how blocks can be a Star, a Cross, or a big X.
You decide!


See the examples towards the end for ideas.


Notice how this block looks like an X?


Bright colors go so well with the black & white prints!  

Add the coordinating borders.

Here are Sally's blocks:


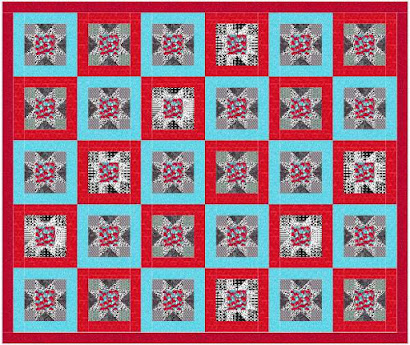
Thirty blocks make a twin size quilt approximately 77"x92"!

Please leave comments below 
- we love feedback. :-)