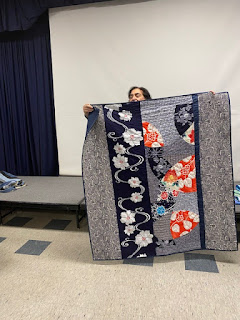
UFO Tote Bag
Supply
list:
UFO blocks
– recommend 12” or larger, cut into strips – or other scraps or several fat
quarters or some 2 ½” strips from a jelly roll… whatever you have – any scraps
are fair game!
½ yard of
lining fabric (or 2 fat quarters)
½ yard of
fusible fleece (I like the thinnest fusible fleece for bags but the foam is
getting very popular too – I really prefer the fusible fleece for this as it is
much easier to handle through the sewing machine.)
¾ yard for
handles and outer bag – note (1 ¼ yd) belt webbing can be substituted for
handles – reduce yardage to ½ yd of fabric.
3” full width strip for bag facing – I used a contrasting fabric that was
not used much in my bag – but you can use whatever you like… - fold/press in
half lengthwise (binding wise) and set aside*** Note: wider is better, but narrower won’t
work. A 3” strip will only give you a 1”
facing.
Thread that
matches the lining fabric
Sewing
machine – walking foot helpful but not required.
This
project will use up some of those blocks you may have started and decided you
just did not like well enough to finish… or maybe just a bunch of scraps that
have no other purpose.
If you have no orphan blocks, any strips will do…. A few fat
quarters will be enough to substitute for the blocks. I used six 12” blocks from a 9 block quilt
that I was never going to finish. I cut
them up into strips of varying widths from 1 ½” to 2 ½” – or maybe 3” not parallel
but narrow at one end and wider at the other.
It doesn’t matter how wide you cut them as long as the cuts are
straight. The wider you cut, the fewer
you need… hint, hint.
I had another piece of fabric in the stash that was about ¾ yard – I cut two 4” strips across the full width for straps and set them aside.
From the rest, I cut for the outside top and bottom of the bag – 3
inches wide x WOF for the top, and 6” x WOF for the bottom.
And …. I cut ½ yard
for the lining from another fabric.
First, I steamed the lining fabric to a piece of
fusible polyester batting. I cut
this into two pieces to make it easier to handle – a front and a back! Each piece was about 20” x 18” (like fat
quarters!)
I marked two parallel lines (with a permanent pen) on the top
and bottom of the fleece side to guide where my strips should cover. You can cover yours in a wider or narrower
strip, but I recommend at least 6- 8”.
Mine was 10”, but 8” looks good, too.
If you make a narrower strip, you’ll need more fabric for the top &
bottom. Think of it this way, you have
an area 18” high and 20” wide to cover with fabric. Your pieced section will need to be 20” wide,
so you may, if necessary, adapt the height to accommodate the size of blocks or
scraps you are using. My blocks were
12”, but I trimmed them to fit 2 bands
of piecing 10” high and 20” wide.
Starting in the middle, I used the ‘quilt as you go’ method
to sew the block/strips to the middle of the fleece. Make sure the strips cover the guidelines on
both ends (top and bottom) as you sew them down. Sew them ‘right sides together’ - You want to
go a little past the lines with your stitches, then pull your threads to the
‘inside’ of the seam and tuck the thread tails into the seam allowance on top. Use ¼” seams for the strip piecing.
Complete a band of strip piecing through the center of both
pieces. Make sure you have covered those
lines you drew on the batting! You may want to snip off any strips that go well
past the lines – but you want to allow for about ½” seams in the rest of the
bag.
Square up both sections once strips are completed.
Measure both fleece/pieced sections and trim so that both
have the same measurement from the pieced section to the top edges and the
bottom edges before adding the bottom and top fabrics.
These will also be added with the “sew & flip”
technique. – you may want to re-mark guidelines onto your pieced sections to
make sure you enclose all the ends in this seam.
After adding the top and bottom fabric to both pieces, baste
or zigzag (not satin stitch, but a wide open zigzag) along the edges to help
prevent them from sliding when you sew the seams – I like to sew all the way
around both pieces with a zigzag stitch to cover the raw edges, since that’s
all the finishing they will get in this bag.
If you have a serger, that also makes a nice finish to these edges.
Note: there is no
lining or turning required with this bag!
The only
difficult part is sewing the side seams so that both sides match exactly…. But
if they don’t it isn’t going to make the bag any less useful!
For the straps, you can use a finished belt webbing in a
color to match, cover the belt webbing with a matching fabric or make straps
from leftover batting with fabric strips wrapped around it and sewn for
reinforcement. A full width strip (4” or
so) with a 1” strip of batting in it will make a nice set of straps.
The straps are usually cut about 20” long. Some like them shorter, some longer – cut
your straps short or longer to your taste.
Make sure they are both the same length.
Straps: Cut 2 strips 4" x 20".
Fold and iron the strips in this way – tucking the webbing or fleece into the
first fold– it doesn’t show in these pics…Sew the edges and make sure the
handles are the same length. Fancy stitches are optional.
Pin the straps to the outside
body of the bag until after the side seams and bottom are sewn.
***Top Edge Facing:
Turn your bag right side up in
front of you – leave the straps pinned for now – pin the pressed facing
strip(s) to the top edge of the bag – raw edges together, fold toward the
bottom, on the OUTSIDE of the bag, OVER the raw edges of the straps. Sew this facing to the top edge of the bag
using your walking foot with a ½” seam allowance. Press the facing up away from the body of the
bag.
Now sew the side seams – top to
bottom – fold the facing seams in opposite directions to make the side seam
less bulky and easier to turn…then sew across the bottom – use a ½” seam
allowance (or more).
Press all seams open – use steam
and/or starch.
Turn the facing to the inside of
the bag. The fold is now on the inside,
ready to cover that unsightly raw edge at the top. Pull the now unpinned straps up into ‘carry
position’ – pin the facing with the pins on the outside of the bag – be sure to
tuck in those facing/side seam allowances or trim them so they don’t show. With facing side down, topstitch ¾” and ½”
from the top edge. Use a decorative or
matching thread. Again, FANCY stitches are optional!
Press side and bottom
seams open. You may need to
‘unstitch’ the corners to get them to lay flat.
Form box bottom.
With bag still wrong side out, align side and bottom seam of
one corner – flatten the point with seams together, steam press the points
open, mark a sewing line about 2” in from the corner/point.
Note – the further you sew from the point,
the wider your bag will be – you decide how ‘flat’ you want your bag! I make mine about 4” wide. Just make sure that BOTH of your corners are
the same distance from the point! Repeat
the operation for the other corner.
You are almost done!
Clip all threads,
trim any straggles, and your bag is finished!
Bring your bag to next guild meeting for show & tell


